Studio Navigation
Get acquainted with the user interface find the settings you want to modify as an administrator.
Overview
Studio is the design space for administrators. This is where you'll will find options to manage data, create and configure content, and maintain security settings for the solution.
To access Studio, on the navigation bar, click Studio ![]() .
.
Note: Studio is only available to administrator users. For instructions on making a user an administrator, see Studio Profiles.
When you enter Studio, you'll land in the global workspace, specifically the Projects room. All changes made in the global workspace must be saved to take effect. These changes will take effect immediately and cannot be rolled back because they exist outside of the project lifecycle. The majority of the time, you'll be working in a project. Projects are how Visier handles version control, allowing you to define and edit the solution separately from the current production version of the solution. In a project, the changes that you make to the solution do not automatically go into effect until they've been reviewed, approved, and published. For more information, about the projects lifecycle, see Projects.
The rooms that are available to you in Studio depend on the profile that you've been assigned. For more information, see Studio Profiles.
The global workspace
The global navigation bar, is the horizontal navigation bar that persists when you're working in the global workspace. It gives you access to settings that can be changed without going through the project lifecycle.
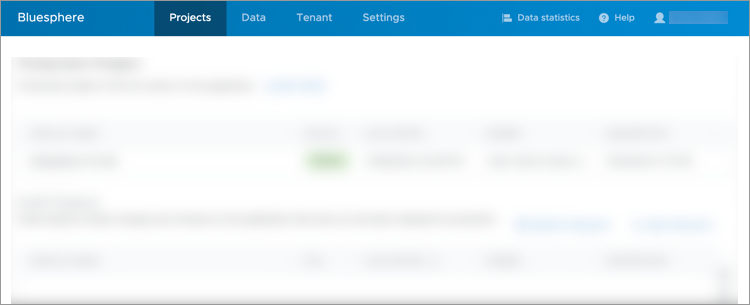
The following table describes the various elements of the global navigation bar.
|
Element |
Description |
|---|---|
|
Projects |
The access point for projects, such as the production version of the solution and any open projects. For more information, see Projects. |
|
Data |
Manage data. Upload data files, create sources that store data, query data files for validation, and set up data connector credentials. For more information, see Data Management. |
|
Tenant |
Manage tenants, users, and profiles. Create new users, assign profiles to control access to administrator capabilities and Studio, and download logs to audit user activity. For more information, see Tenant Management. |
|
Settings |
Manage and configure various settings that affect how users sign in, customize the look and behavior of the solution, and access APIs. |
|
Data Statistics |
See how much data Visier is processing. |
|
Help |
Directs users to the Visier Service Portal by default. You can remove the Help button or replace the Visier Service Portal link with a different link. For more information, see White Label Visier. |
|
User |
Manage user preferences or sign out of the solution. |
Data
The following table describes the rooms under Data.
|
Room |
Description |
|---|---|
|
Data Flow |
Explore a visual representation of how data flows from your source files into Visier's analytic objects. For more information, see Data Flow Visualization. |
|
Data Transfers |
Upload and manage data files sent to Visier. For more information, see Upload Data Files Using the Solution. |
|
Sources |
Create and manage sources that store data and are mapped to data load targets. For more information, see Sources. |
|
Query |
Investigate your source data and find specific details in your raw data files. For more information, see Query Source Data. |
|
Standardizations |
Correct and manually select standardization matches for your data. Standardizations are a set of standard industry values that are matched to your unique data values. For more information, see Override a Standardization Match. |
|
Reported Issues |
Review, fix, and publish corrections for flagged data issues. For more information, see Manage Reported Data Issues. |
|
Connector Credentials |
Create connector credentials to authenticate Visier with your source system for data extraction. For more information, see Set Up Data Connectors. |
|
Data Versions |
Control whether new data versions are available in production. For more information, see Make all new data versions available for production. |
Tenant
The following table describes the rooms under Tenant.
|
Room |
Description |
|---|---|
|
Users |
Create user accounts, manage user details, access bulk user management options, assign profiles, and download logs to audit user activity. For more information, see User Management. |
|
Profiles |
Create and configure profiles to control access to administrator capabilities and Studio. For more information, see Studio Profiles. |
|
Reassign Content |
Change the ownership of user created content in the solution. For more information, see Reassign Content to Another User. |
|
Scheduled Content |
Manage the analysis emails scheduled to be pushed across your tenants. For more information, see Manage Email Push Schedules. |
|
Security |
View non-versioned permissions, data access sets, and user groups. For more information, see Non-Versioned Security. |
Settings
The following table describes the rooms under Settings.
|
Room |
Description |
|---|---|
|
Share Files |
Upload and share non-data files, such as screenshots or video captures, with Visier. For more information, see Share Files. |
|
Publishing |
Allow Visier Technical Support users to publish approved projects on your behalf. For more information, see Projects. |
|
Configure SFTP |
Enable an SFTP account in the solution, in order to automate the file upload process. For more information, see File Upload Using SFTP. |
|
Manage PGP Keys |
Generate and download public encryption keys to encrypt data files. For more information, see Encrypt files. |
|
Network Access |
Restrict the IP addresses where users can access the solution. For more information, see Set Up Network Access. |
|
Embeddable Domains |
Create a list of trusted domains that may embed Visier's visuals and analyses. For more information, see Add Your Domain to the Embeddable Domains List. |
|
PowerPoint Template Upload |
Upload a custom PowerPoint template so that any downloaded content will be in your preferred slide structure and format. Each tenant can use one custom template at a time. For more information, see Upload a Custom PowerPoint Template. |
|
Employee Photo Upload |
Upload photos of employees so that they can be displayed in the solution. For more information, see Upload Employee Photos. |
|
Mailing List |
Add users that want to be notified when a new data version is published to production, or when a data version cannot be validated. For more information, see Manage the Mailing List. |
|
Email Templates |
Customize the emails that are sent to users for certain events, such as a welcome email for new users. For more information, see Customize an Email Template. |
|
API Keys |
Generate an API key and copy it to use in API functions. For more information, see Generate an API Key. |
|
Session Validity |
Define the maximum session length and timeout for a session. For more information, see Set Up Session Validity. |
|
Email Domains |
Manage the list of user email address domains that are allowed to sign in to Visier. For more information, see Allowed Email Domains. |
|
Embedded App Config |
Change the frequency of the session alive message. For more information, see Embed the Full Visier Application. |
|
Partner Single Sign-On |
Configure SSO to allow users to sign in to the administrating tenant using their credentials from an external identity provider. For more information, see Set up single sign-on in Visier. |
|
Tenant Single Sign-On |
Configure SSO to allow users to sign in to the analytic tenants using their credentials from an external identity provider. For more information, see Set up single sign-on for your analytic tenants. |
Projects
The navigation bar is the vertical navigation bar that persists when you're working in a project. It gives you access to objects and settings that are subject to the project lifecycle.
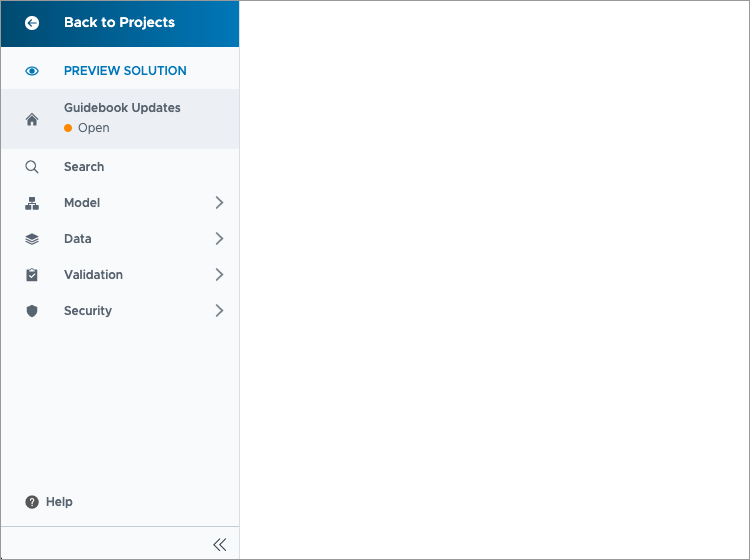
The following table describes the various elements of the navigation bar.
|
Element |
Description |
|
|---|---|---|
|
|
Back to Projects |
Close the project and return to the global workspace. |
|
|
Preview in Tenant |
See the effect of the changes you've made in your project in a tenant. The default is the administrating tenant. |
|
|
Home |
Manage your project and review the changes you've made. |
|
|
Search |
Find the objects available in the solution. |
|
|
Model |
Manage the objects and content available in the solution such as concepts, dimensions, metrics, analyses, and guidebooks. |
|
|
Planning |
Manage What-if models. |
|
|
Data |
Set the data version. |
|
|
Validation |
Validate or troubleshoot your data, including issues that may arise when new data is loaded into the solution. |
|
|
Security |
Define security access to the solution with permissions, filters, and user groups. |
Model
The following table describes the rooms under Model.
|
Room |
Description |
|---|---|
|
Alerts |
Create and modify personalized alerts. Alerts notify you if a metric exceeds your defined threshold. For more information, see Create Personalized Alerts for User Groups. |
|
Analyses |
Create and modify analyses. Analyses allow you to shape your data into stories and dashboards. For more information, see Create an Analysis in Projects. |
|
Analytic Objects |
Create and modify analytic objects, such as subjects and events. For more information, see Analytic Objects. |
|
Concepts |
Create and modify concepts. Concepts standardize information and group data. For more information, see Concepts. |
|
Data Enrichments |
Create and modify the predictions and standardizations to enrich your existing data. For more information, see Data Enrichments. |
|
Data Exports |
Create an export to use Visier metrics and data outside of the solution. For more information, see Create a Data Export. |
|
Data Types |
Create and modify data types that define the structure of data records, such as currency and time. For more information, see Data Types. |
|
Dimensions |
Create and modify dimensions. Dimensions organize values into a list or hierarchical structure. For more information, see Dimensions. |
|
Explanations |
Create and modify reusable explanation snippets that can be inserted into the explanations of other objects. For more information, see Create, Edit, and Insert an Explanation. |
|
Guidebooks |
Create and manage guidebooks to curate a collection of related topics and analyses. For more information, see Guidebook Management. |
|
Metrics |
Create and modify metrics. Metrics are business concerns that can be quantified as a number. For more information, see Work With Metrics. |
|
Reports |
Create and modify reports that summarize and present data in a tabular format. For more information, see Reports. |
|
Settings |
Manage configurations and default preferences that take effect once published to production. Customize the color palette, set up aggregate thresholds, |
|
Tags |
Create and modify tags. Tags are user-defined categories for grouping related content. For more information, see Create and Assign Tags to Content. |
|
Vee |
Create and modify the Vee sample questions that appear in the conversation interface. For more information, see Customize Vee Sample Questions. |
|
View Details |
Select and organize the list of properties displayed in the Detailed View and Distribution visuals. For more information, see Configure View Details. |
Planning
The following table describes the rooms under Planning.
|
Room |
Description |
|---|---|
|
What-if |
Create and configure What-if models that allow you to explore scenarios and compare outcomes. For more information, see What-if Models. |
Data
The following table describes the rooms under Data.
|
Room |
Description |
|---|---|
|
Business Calendar |
Upload a business calendar that represents your organization's definition of a year. For more information, see Upload a Business Calendar. |
|
Connectors |
Create and configure connectors to extract data from different source systems. For more information, see Set Up Data Connectors. |
|
Data Flow |
Explore a visual representation of how data flows from your source files into Visier's analytic objects. For more information, see Data Flow Visualization. |
|
Jobs |
Monitor, trigger, schedule, and troubleshoot data load jobs to generate a new data version in a project or for production. For more information, see Jobs. |
|
Mappings |
Create and modify how data in your sources is loaded. Mappings connect data sources to data load targets. For more information, see Mappings. |
|
Reported Issues |
Manage the list of corrections applied to the project, and conduct a final review before publishing them. For more information, see Manage Reported Data Issues. |
|
Rules |
Create business rules, system rules, and multi-subject rules to specify how your data is loaded into Visier. For more information, see Rules. |
|
Tenant Settings |
Define information about your tenant, such as the data start and end dates. For more information, see Tenant Settings. |
Validation
The following table describes the rooms under Validation.
|
Room |
Description |
|---|---|
|
Data Version Download |
Download a table of available analytic objects, properties, and dimensions to validate your data records and to troubleshoot data issues for your current data version. For more information, see Data Version Download. |
|
Debugging |
Inspect your data records and transformations made to your data throughout the event stream. For more information, see Data Validation and Troubleshooting. |
|
Summary Metrics |
Configure the metrics that appear in the project dashboard for validation and monitoring. |
Security
The following table describes the rooms under Security.
|
Room |
Description |
|---|---|
|
Content Packages |
Create and modify content packages to define the content that is available to users in different parts of the solution. For more information, see Content Packages. |
|
Data Access Sets |
Create and modify data access sets to define the level of access that users have to properties and property values for analytic objects. Quickly apply predefined data access sets when creating permissions. For more information, see Create a Data Access Set. |
|
Permissions |
Create and modify permissions to define which data, actions, and content users can access. For more information, see Create a Permission. |
|
Security Filters |
Create and modify security filters to define the population access to analytic objects. Quickly apply predefined security filters when creating permissions. For more information, see Security Filters. |
|
User Groups |
Create and manage user groups to quickly assign permissions to a large population of users. For more information, see User Groups. |
|
Users |
Assign permissions to users, preview what they can see in the solution experience, and see the profiles, permissions, user groups, analytic capabilities, and content packages they have been assigned. For more information, see User Management. |
Studio Assistant
Note: Limited Availability This feature is in limited availability. If you're interested, please contact your Customer/Partner Success Manager.
Your organization must also opt in to AI features. In the global workspace, click Settings > AI Features.
Get answers to general questions, best practices, and basic how-to information in Studio using the Studio Assistant. It provides clear, actionable step-by-step guidance for your workflows. Whether you have a question about a particular setting or need clarification on your next step, the Studio Assistant delivers immediate answers and insightful tips precisely when you need them.
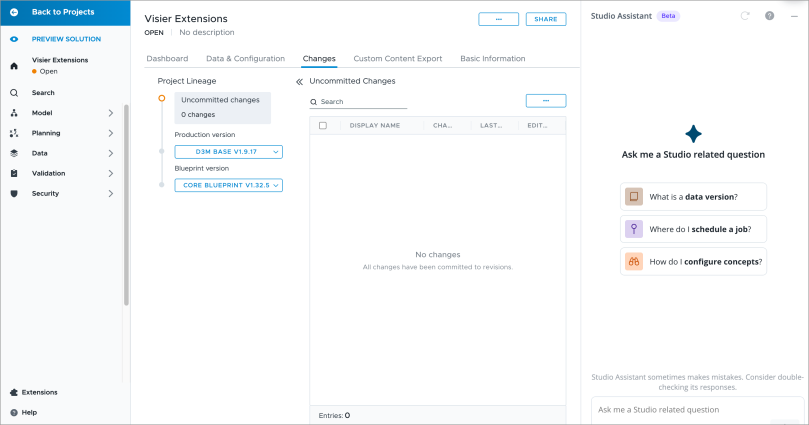
To access the Studio Assistant, click the Studio Assistant icon.
![]()
With the Studio Assistant, you can:
- Ask Studio related questions and receive answers. For more information, see Ask Studio Assistant.
- Get an explanation of the formula logic for metrics, concepts, and rules. For more information, see Formula explanations.
Ask Studio Assistant
Use the following workflow as guidance when chatting with the Studio Assistant.
- Enter a question in plain language.
-
Review the answer.
- If applicable, click the Action button and select a referenced page from the list, for example, Model > Metrics. The Studio Assistant will navigate you to that location. The visibility of the Action button is based on your user access levels and whether there is relevant content to reference.
- Ask a follow-up question. The Studio Assistant retains your chat history in a single chat session, so you don't need to worry about retyping the whole question from scratch. You can ask multiple questions to delve deeper into a single inquiry.
- Rate the response. Click the Helpful button
 or Wasn't Helpful button
  to provide feedback. If a response wasn't helpful, please include a brief comment explaining what you expected to see. This helps the Studio Assistant improve future answers.
 - To start a new conversation, click the Reset button
 in the upper-right corner of the screen. The Studio Assistant retains context in a single chat session to better understand follow-up questions, maintain continuity, and provide more natural, relevant responses. Start a new conversation with the Studio Assistant when you switch to a completely new and unrelated topic, if the current thread has become too long, or when you want a clean slate.
 -
If you sign out and sign back in, you can resume your most recent chat session by clicking Restore last conversation at the bottom of the screen. The Studio Assistant retains the context of the last conversation so it's easy to pick up where you left off.
Note: This option will no longer be available once you ask a question in your new chat session.
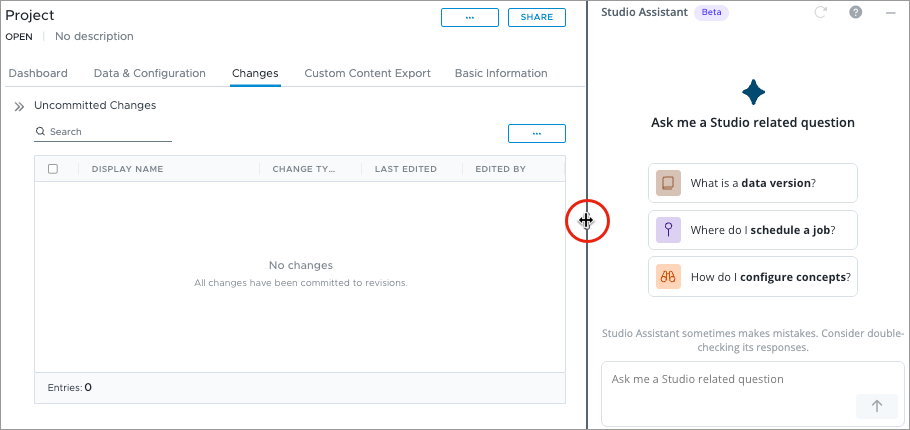
Tip: To resize the Studio Assistant, click the resize line and drag it to the desired width.
Formula explanations
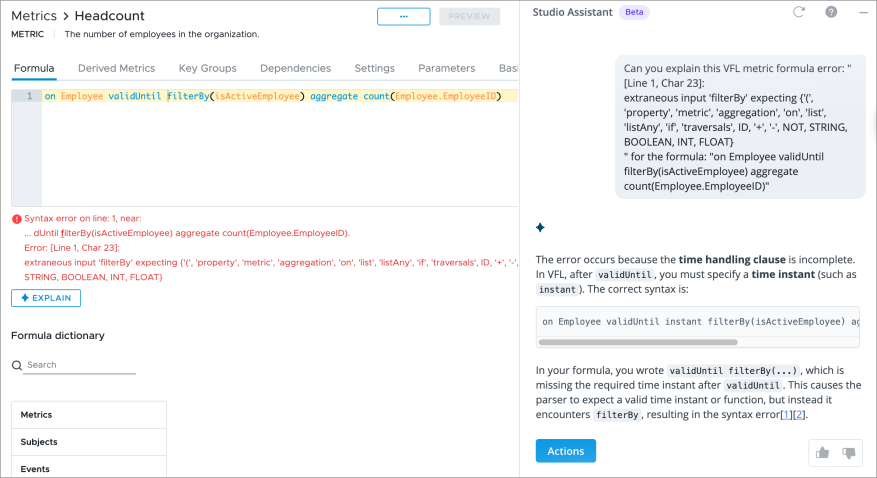
You can use the Studio Assistant to help you understand the logic behind formulas for certain objects. If the formula is valid, it explains what it does. If it is invalid, it explains what the errors mean. It's available for metrics, calculated selection concepts, business rules, multi-subject rules, and extraction rules.
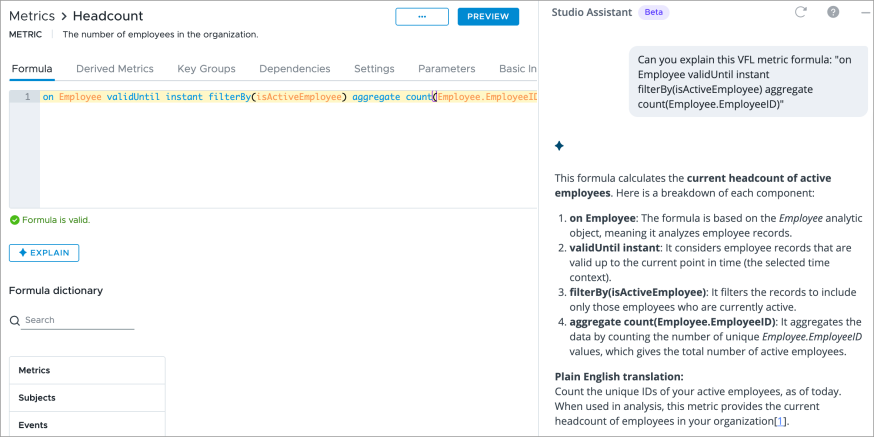
Simply click the Explain button next to a formula.

If the formula is valid, this will generate a clear explanation and breakdown of its logic from the Studio Assistant.
If the formula has a validation error, you can click the Explain button next to the error message.
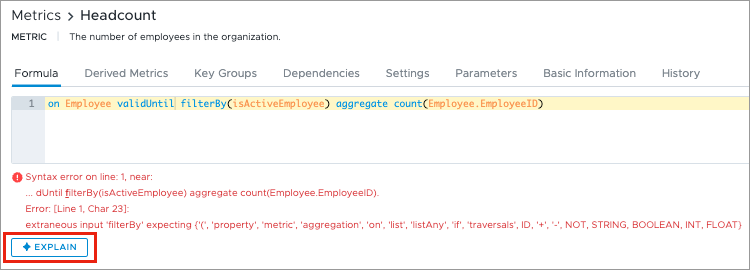
This will generate an explanation of what the error means and provide guidance on how to fix it in your formula. This simplifies the debugging process, helping you resolve issues quickly and efficiently.
